
Video stabilization (deshaking)
Video stabilization (also called deshaking) is the process of eliminating shake that occurs when shooting video. This operation is quite resource-intensive and, in any case, with losses. We lose a little quality during video compression. With a high degree of probability, we lose part of the image at the edges of the frame, so we recommend that you try to shoot a stable video initially.
To obtain an acceptable deshaking result, the video editor operates two passes. At first, it scans the video and tries to determine the static part of the frame (now it should become clear why we lose some parts of the image at the edges of the frame). The second pass is cutting out the found static part of the frame, stretching it to the entire available area of the frame and saving. Some programs try to stabilize the video in real-time, in one pass. Still, no matter how hard we tried, we did not notice the difference visually after such "stabilization" :) Only two-pass algorithms give a good result. This is what we chose for Bolide Movie Creator.
Eliminate video shake in Bolide Movie Creator
There are two ways to stabilize video in our video editor: you can eliminate shaking in the whole video file listed in the Photo/Video library or de-shake a selected video block in a timeline.
-
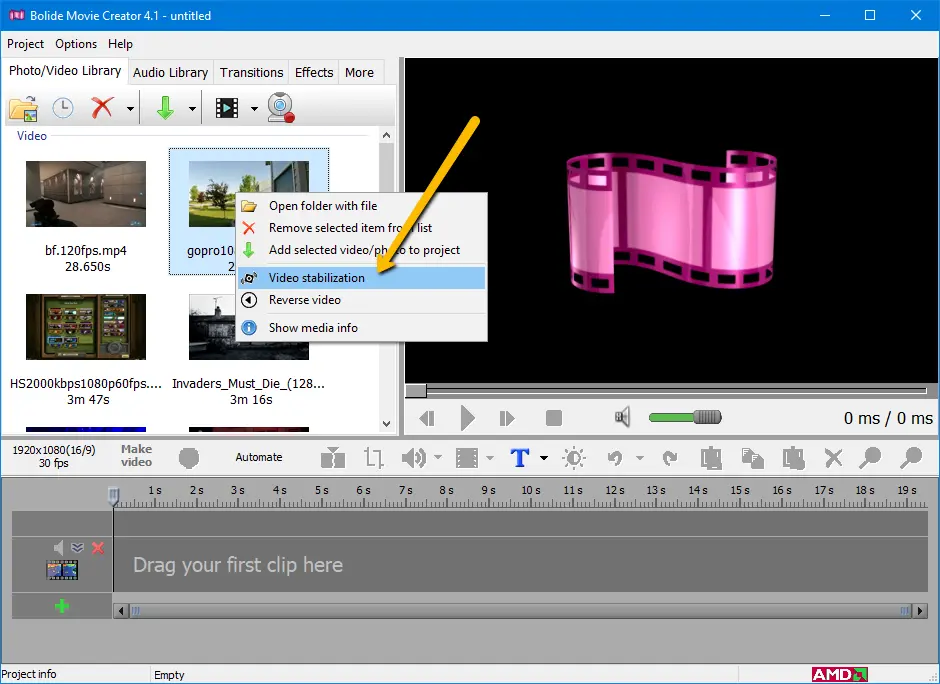
If you need to stabilize the entire video from the library, right-click on it and select the "Video stabilization" pop-up menu item. You can also select the file and use the stabilization button with a drop-down arrow on the Photo/Video Library toolbar: its menu contains "Video stabilization" and "Reverse video" (see Reversing a Video). The result is saved as a new file named <original name>_stabilized.mp4 and added to the library; the original file stays untouched.
-
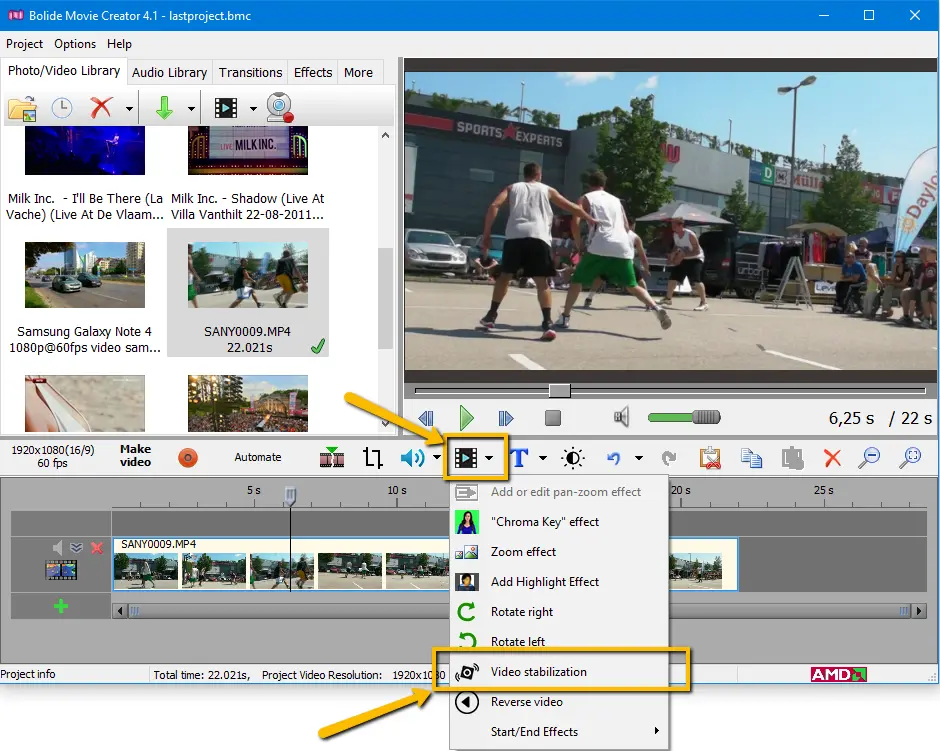
If you already placed a video to the timeline and cut it as you need, select its block, click the "Operations on visual blocks" button and choose "Video stabilization". If the block is trimmed, only the part used in the project is processed. When the job is done, the stabilized file replaces the original video in this block.
-
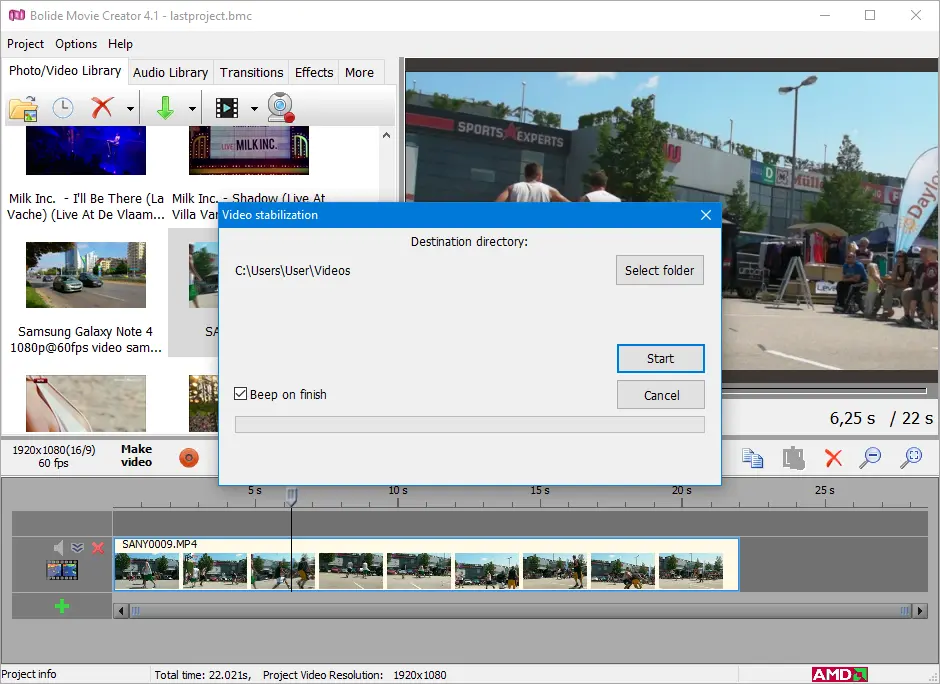
The "Video stabilization" dialog opens. At the top you see the "Source file" and the "Destination directory" where the stabilized video will be saved. The program picks the last used folder; if there is not enough space there, it tries your Videos folder, then Documents. To choose another folder, click "Select folder". The disk needs free space of at least one and a half times the size of the source file, otherwise the "Start" button is unavailable.
-
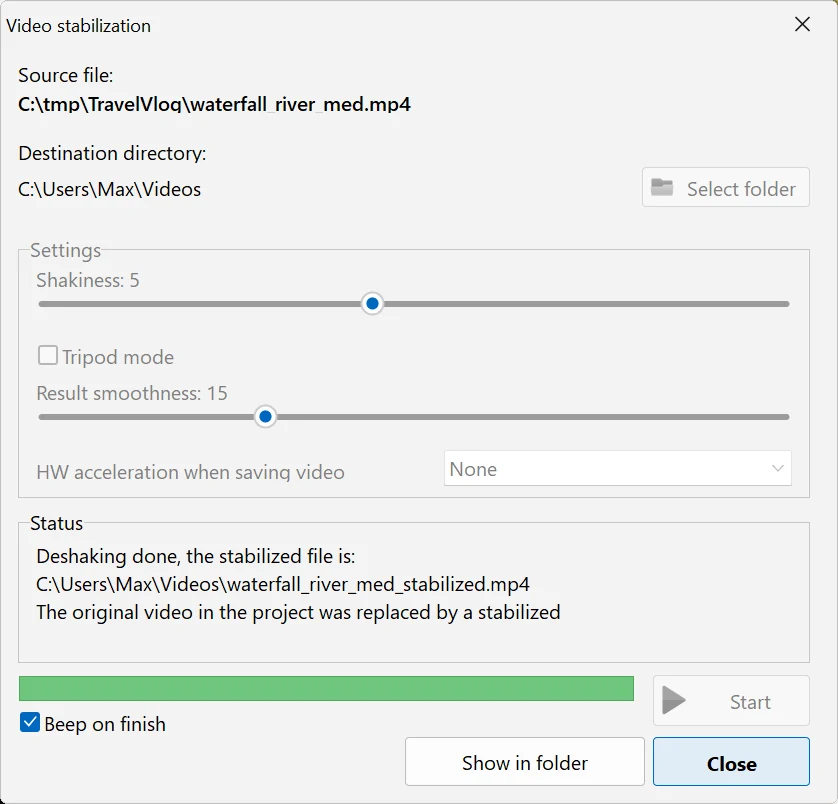
In the "Settings" group you can fine-tune the stabilization:
- "Shakiness" (1 to 10, default 5) — how shaky the source video is and how fast the camera moves. Raise it for strong shaking or quick camera movements, lower it if the shake is slight.
- "Result smoothness" (0 to 50, default 15) — how smooth the camera movement will be in the result. Higher values give a calmer picture, but more of the frame edges may be cut off; lower values keep more of the original camera motion.
- "Tripod mode" — for shots where the camera was supposed to stand still: the picture is held in place as if the camera were on a tripod. Do not use it for pans or shots with a moving camera. When it is on, the "Result smoothness" slider is disabled.
- "HW acceleration when saving video" — which video card helps to save the result: NVIDIA (NVENC), AMD (AMF), Intel (QSV) or None. Only the options available on your computer are listed. If saving fails or the result looks wrong, choose None.
- Since the operation is quite long, the "Beep on finish" option is on by default and will remind you of the end of the process with a sound signal. You can turn it off at any time.
- Press "Start". The "Status" group shows the current stage — "Detecting the stable part of the frame (1/2)", then "Stabilizing and saving the video (2/2)" — and the approximate time left. For a trimmed block the program first creates a temporary clip ("Creating a temporary video clip"). The progress is also shown on the program's button in the Windows taskbar, so you can switch to other windows while you wait. "Cancel" stops the process.
-
When the job is done, the status shows the path of the new file and what happened to it: it was added to the library, or the original video in the project was replaced by the stabilized one. The "Show in folder" button appears, and "Cancel" turns into "Close".
- Useful advice! We recommend stabilizing the video parts as short as possible! There is no point in deshaking in a long video if you only need a small piece of it! Add the video to the project, cut/split it as needed, and stabilize only the part you need.
- Even better, try to shoot stable video in the first place. That is what tripods are for :)
Back to Video Editing Guide.