Project Video Resolution and Frame Rate
The resolution (frame size in pixels) and the frame rate are settings of the whole project. They decide the shape of your movie: horizontal 16:9 for YouTube and TV, vertical 9:16 for phones, Shorts, Reels and TikTok, or square. The preview and the saved video always use these settings, so it is best to choose them before you start placing texts and overlays.
How the resolution is chosen automatically
-
When you put the first clip on an empty timeline, the project takes its settings from this clip, without any message:
- a video gives the project its size and frame rate (the frame rate is rounded to the nearest standard value: 23.976, 24, 25, 29.97, 50, 59.94, 119.88 or 120 fps); very large videos give a 3840x2160 project;
- a photo gives a horizontal project of 16:9 or 4:3 (whichever is closer to the shape of the photo), up to 1920x1080 or 1280x960, at 29.97 fps.
- So if you are making a vertical or a square video, check the resolution button after adding the first clip and choose the size you need.
Choose a ready-made resolution
-
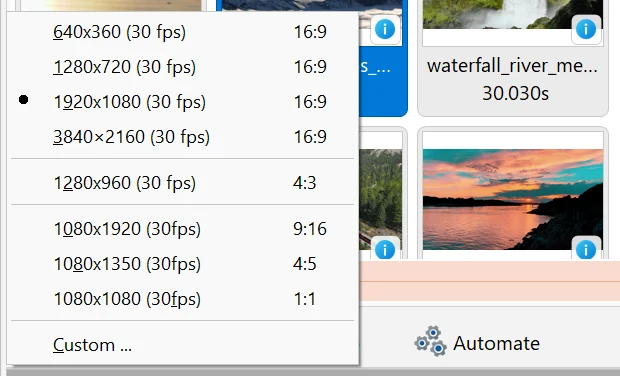
The Output video resolution button on the timeline toolbar shows the current settings, for example 1920x1080 (16/9) and 30 fps. Click it to open the list of sizes:
- 640x360, 1280x720 (720p), 1920x1080 (Full HD, 1080p), 3840×2160 (4K) - horizontal 16:9;
- 1280x960 - 4:3, the shape of old TVs and many photos;
- 1080x1920 - vertical 9:16 for phones, Stories, Shorts, Reels and TikTok;
- 1080x1350 - 4:5, a slightly vertical frame for Instagram and Facebook feeds;
- 1080x1080 - square 1:1;
- your recent custom sizes (up to 5) appear in a separate group below;
- Custom ... - any other size and frame rate (see below).
- Changing the resolution can be undone with the Undo button (Ctrl+Z).
Set any size: the Custom dialog
-
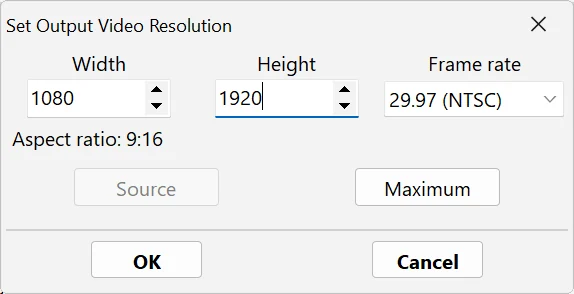
Choose Custom ... in the list. The Set Output Video Resolution window opens with the current project settings:
- Width and Height - the frame size in pixels. The minimum is 80 x 60. Only even numbers are allowed: the arrows change the value by 2, and an odd number you type is rounded down. The line below shows the resulting Aspect ratio, for example 16:9.
- Frame rate - choose from the list: 15 (Multimedia), 23.976 (IVTC Film), 24 (Film), 25 (PAL), 29.97 (NTSC), 50 (Double PAL), 59.94 (Double NTSC), 119.88 (Quad NTSC), 120. The high frame rates 119.88 and 120 are for smooth slow motion from action and phone cameras that record at 120 fps. A WMV file cannot have more than 60 fps, so such a project is saved to WMV at half the frame rate.
- Source - takes the size of the source video: the only video in the project or, if there are several, the video clip selected on the timeline. The frame rate is not changed. If there is no such video, the button is unavailable.
- Maximum - takes the largest size and frame rate of all videos in the project while keeping the current aspect ratio: the frame is enlarged so that every video fits without being scaled down. Photos are not taken into account.
-
Click OK (or press Enter) to apply the settings, or Cancel (Esc). A new size is added to the list of the Output video resolution button, so next time you can choose it in one click.
What happens to clips when the aspect ratio changes
- If you change only the size and keep the aspect ratio (for example, 1920x1080 to 1280x720), nothing moves: the whole picture is just scaled.
- If the aspect ratio changes (for example, from 16:9 to 9:16), the program fits all blocks into the new frame automatically: clips that filled the whole frame fill the new frame, smaller pictures keep their proportions and are moved inside the frame, full-frame texts are fitted and centered, and other texts keep their center and relative size. Check the result in the preview; if you don't like it, click Undo.
Clips of a different shape: black bars and blurred background
-
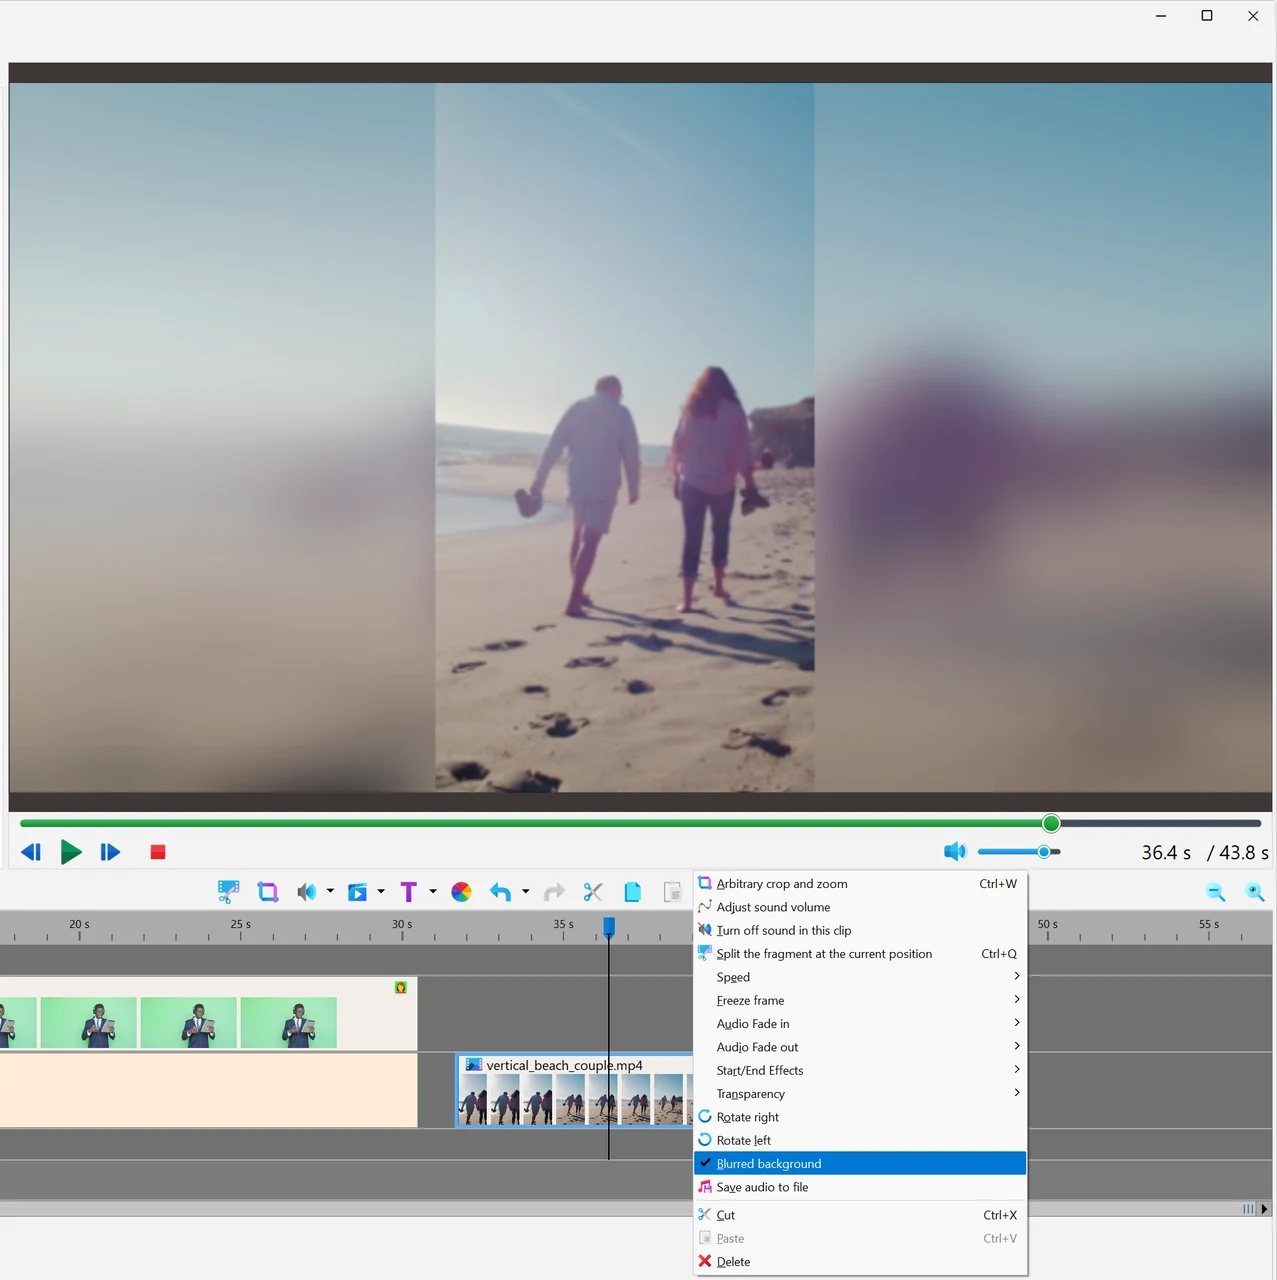
A clip whose shape differs from the project, for example a vertical phone video in a horizontal project, is shown whole, with black bars at the sides. To fill the bars, right-click the clip and choose Blurred background: the bars are filled with a blurred copy of the same clip. Choose the item again to turn the effect off. It works for videos and photos and applies to all selected blocks at once. If the clip already fills the whole frame, it is reduced to 90% and centered, so a blurred border appears around it.
- Instead of the blur you can put any picture or video on the track below the clip: tracks are layered from the bottom up (see Working with Tracks and the Timeline).
-
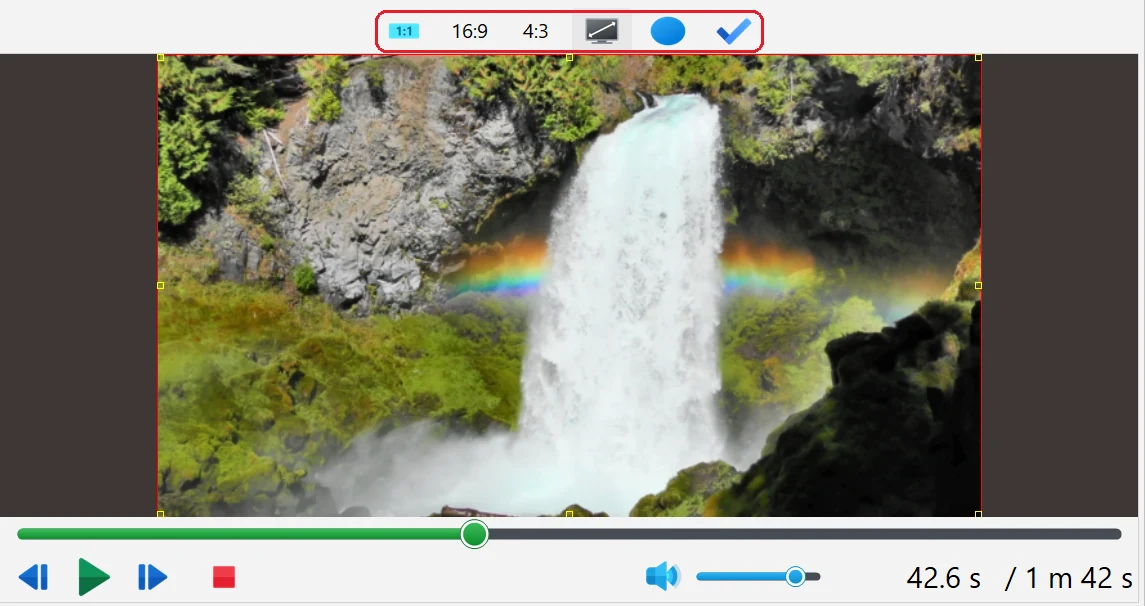
You can also change the shape of the clip in the frame. Select the clip on the timeline, and a frame with handles appears around it in the preview window (drag it to move and resize the picture). Buttons appear above the preview:
- Set aspect ratio: original - returns the original proportions of the clip;
- Set aspect ratio: 16:9 and Set aspect ratio: 4:3 - give the frame these proportions (the picture is stretched to fit them);
- Expand to the whole frame - stretches the clip to the whole frame of the project; if the shapes differ, the picture is distorted.
Good to know
- The resolution and frame rate are not set in the Save to Video dialog: the video is saved with the project settings, and the file name gets the size added, for example my_project_1920x1080. If the project settings are lower than the quality of your source videos, the dialog shows a hint like The project settings (...) are below the quality of the source files. For best quality use ... with a Set ... button that applies the suggested settings (this can be undone). See Convert Video to another Format.
- Setting a resolution higher than your source files does not add detail; it only makes the file larger and saving slower. For the sharpest result, use the size of your best source video, for example with the Maximum button.
- If your project contains a single 120 fps video and you slow it down 2 or 4 times from the Speed menu, the project frame rate switches to 60 or 30 fps automatically (see Changing Video Speed).
- The resolution and frame rate are saved in the project file (see Saving and Opening Projects).
Related topics
- Convert Video to another Format
- How to Rotate Video Clip
- Cropping Video Frame
- Working with Tracks and the Timeline
- Video Editing Glossary
Back to Video Editing Guide.