
Improving the Sound of a Clip
A voice recorded on a phone or a cheap microphone often has hiss in the background and sounds too quiet. Bolide Movie Creator has four tools to fix and color the sound of a clip: noise reduction with volume normalization, pitch shift, an equalizer and reverb. Each of them works on one audio clip or one video clip with sound, and you can listen to the result before you apply it.
Where to find the sound tools
-
Select an audio clip or a video clip with sound on the timeline. Click the Audio operations button on the timeline toolbar. The menu contains Reduce noise in audio, Adjust sound, Pitch shift, Equalizer, Reverb, Add music visualizer and Turn off sound in this clip. The button is available only when the selected clip has sound.
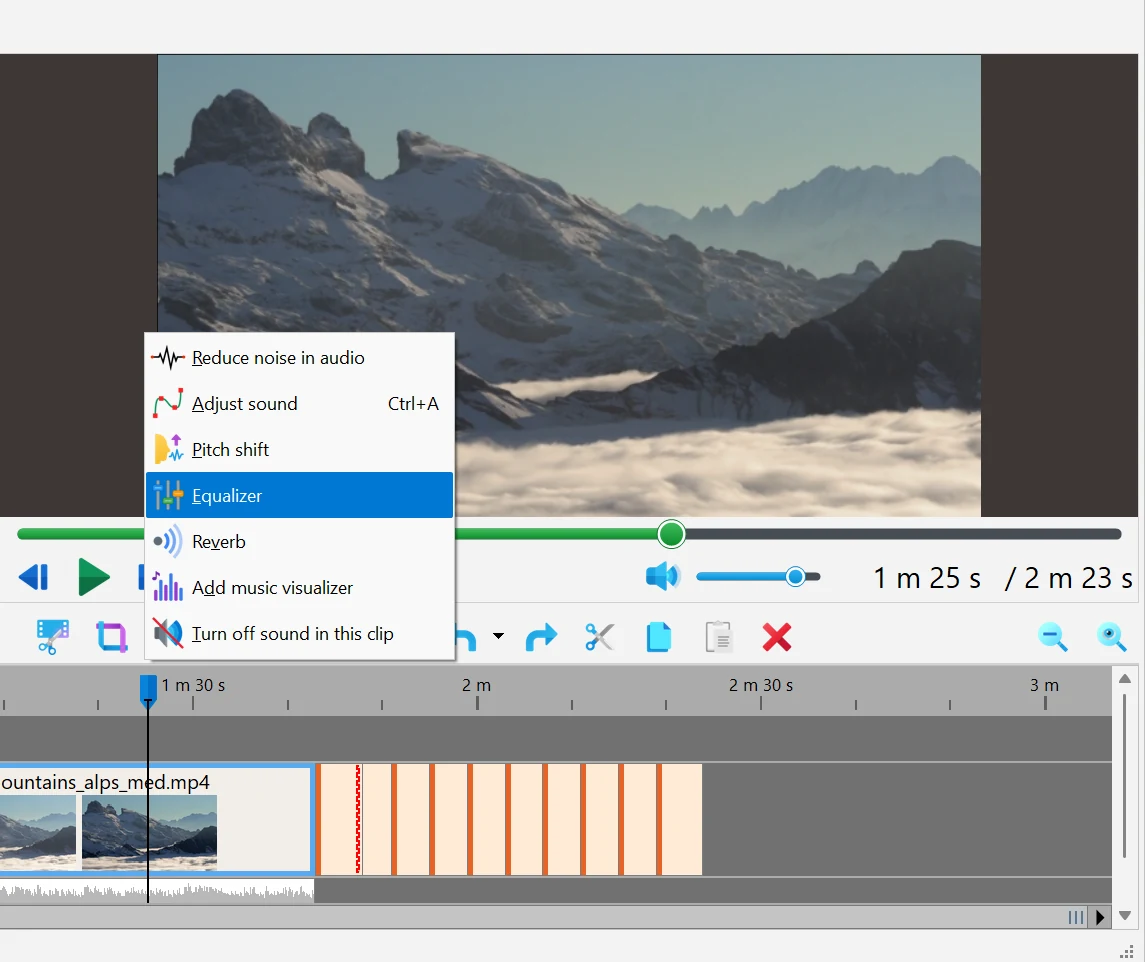
- When you choose a tool, the effect is added to the selected clip and its settings window opens. While the window is open, only the track with this clip is heard, so other music and voices do not get in the way. Click OK to keep the effect or Cancel to leave the clip as it was.
-
An added effect is shown as a small icon on the clip block. Point at the icon to see its name (Microphone sound improvement, Pitch shift, Equalizer or Reverb). Click the icon to open its menu: Settings opens the settings window again, Delete this effect removes the effect from the clip.

- Each tool can be added to a clip only once. If you choose the same command for a clip that already has this effect, its current settings open instead.
- The volume itself (the volume line, key points, fades and mute) is described on a separate page: Adjusting Audio Levels in Your Video.
Noise reduction and volume normalization
-
Select the clip and choose Audio operations > Reduce noise in audio. The Sound improvement settings window opens. First the program analyzes the sound, which takes a few seconds; you see Please wait... and the controls are unavailable. For a new effect both options are turned on.
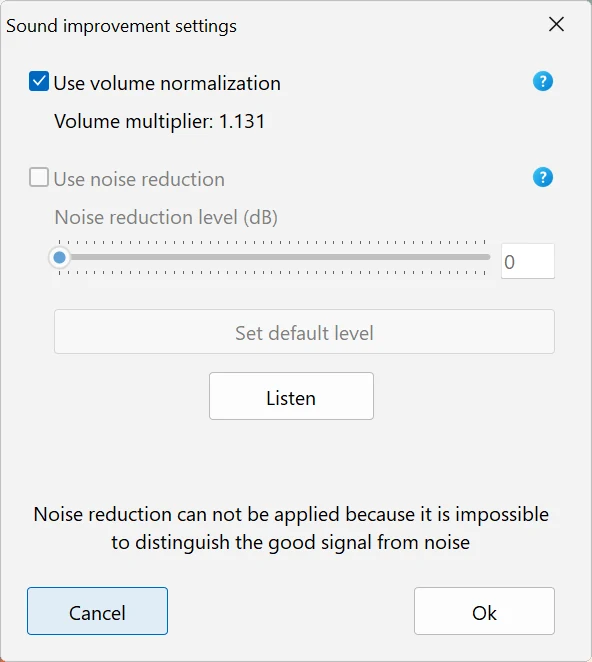
- Use volume normalization raises a quiet recording to a normal level. The window shows the result as Volume multiplier: for example, 2.5 means the sound becomes 2.5 times louder.
- Use noise reduction removes steady background noise such as microphone hiss or the hum of a fan. Noise reduction works together with normalization: when you turn noise reduction on, normalization is turned on too, and when you turn normalization off, noise reduction is turned off as well.
- Noise reduction level (dB) sets how strongly the noise is suppressed, from 0 to 48 dB; the default is 12 dB. A higher level removes more noise, but the voice can start to sound unnatural. Set default level returns the slider to 12. After you release the slider, the sound is analyzed again.
- Click Listen to play the clip with the current settings (the button changes to Stop). The playback starts from the preview cursor if it is inside the clip, otherwise from the start of the clip, and repeats until you stop it.
- The line at the bottom of the window gives a hint about what to do next. If the program cannot tell the voice from the noise, it says Noise reduction can not be applied because it is impossible to distinguish the good signal from noise, and the noise reduction option is unavailable. If the sound is already clean and loud enough, you see It seems that this sound does not need to be improved.
- If you open the settings of an existing effect and click Cancel, the previous settings are restored (Restore the old settings...).
Pitch shift
-
Choose Audio operations > Pitch shift. In the Tune pitch shift window move the slider toward Lower to make the voice or music sound lower, or toward Raise to make it higher. The slider goes from -100 to 100, the current value is shown above it. A new effect starts slightly raised (16).
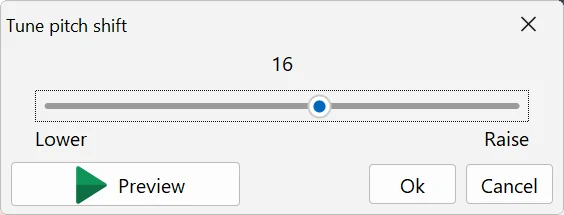
- Click Preview or press Space to listen; the new pitch is applied when you release the slider. Only the pitch changes, the clip keeps its length and speed.
- To keep the natural voice when you change the speed of a clip, you do not need this tool: use Do not change the tone of the sound, see Changing Video Speed.
Equalizer
-
Choose Audio operations > Equalizer. The Equalizer window has a Preamp slider and 10 band sliders: 31 Hz, 62 Hz, 125 Hz, 250 Hz, 500 Hz, 1 kHz, 2 kHz, 4 kHz, 8 kHz and 16 kHz. The left bands control the bass, the middle ones the voice, the right ones the treble.
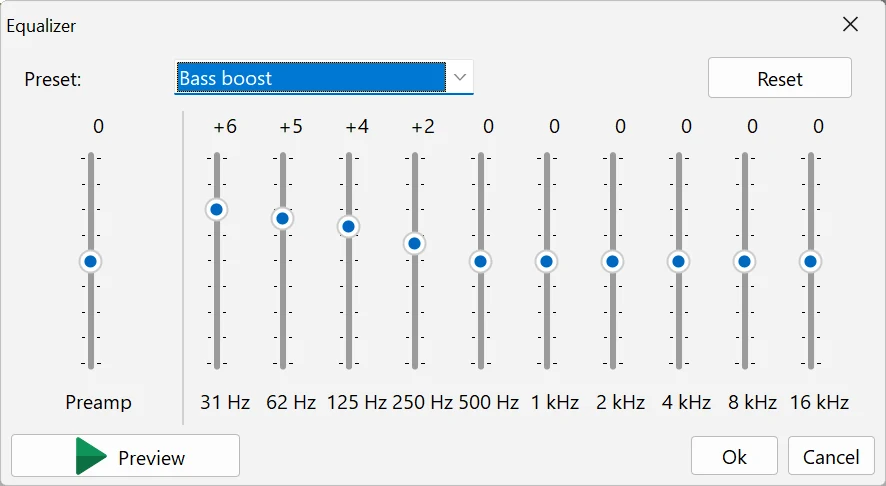
- Each slider changes its band from -12 to +12 dB in steps of 1 dB; the value is shown above the slider. Preamp changes the overall level before the bands, also from -12 to +12 dB: lower it a little if boosted bands make the sound distort. A new equalizer is flat, all sliders at 0.
- The Preset list sets the bands for a typical task: Flat (no changes), Bass boost, Bass cut, Treble boost, Treble cut, Voice (more midrange, clearer speech) and Loudness (more bass and treble). Presets do not change the preamp. When you move a band slider yourself, the list shows Custom.
- Reset sets all sliders, including the preamp, back to 0. Click Preview or press Space to listen. When the window opens, the first band slider has the focus, so you can change it with the arrow keys right away.
Reverb
-
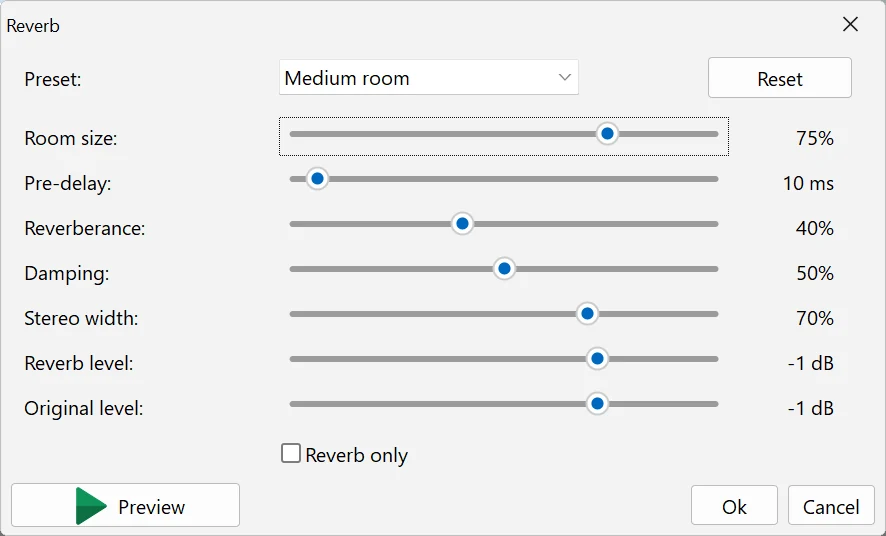
Choose Audio operations > Reverb. Reverb adds reflections so that the sound seems to be recorded in a room, a hall or a church. A new effect uses the Medium room preset.
-
The window has seven sliders:
- Room size (0–100%) — how large the room sounds.
- Pre-delay (0–200 ms) — the pause between the original sound and the first reflections.
- Reverberance (0–100%) — how long the reverb tail lasts.
- Damping (0–100%) — how quickly high frequencies die away in the reflections; higher values give a softer, darker sound.
- Stereo width (0–100%) — how wide the reverb spreads between the left and right channels.
- Reverb level (-30 to +10 dB) — the volume of the reflections.
- Original level (-30 to +10 dB) — the volume of the original sound.
- Reverb only leaves only the reflections, without the original sound.
- The Preset list has nine ready-made rooms: Vocal I, Vocal II, Bathroom, Small room, bright, Small room, dark, Medium room, Large room, Church hall and Cathedral. A preset sets all seven sliders but does not change the Reverb only checkbox. If you move a slider, the list shows Custom. Reset returns the Medium room settings and turns Reverb only off.
- Click Preview or press Space to listen; a changed value is applied when you release the slider.
Remove or undo an effect
- To remove a sound effect, click its icon on the clip block and choose Delete this effect.
- Right after adding an effect you can also click Undo on the timeline toolbar or press Ctrl+Z.
- To change the settings later, click the icon and choose Settings. Cancel in the settings window keeps the settings the effect had before.
Good to know
- The tools work on one clip at a time: the one selected on the timeline. To improve several clips, select them one by one and apply the tool to each.
- If you split a clip, both parts keep its effects. The effects change only the sound in the project; the original files on your disk are not changed. The result is saved when you save the video (Convert Video to another Format) or the sound (Project > Save audio to file).
- If a video has several audio tracks, the effect is applied to the track that is currently chosen for the clip: click the audio tracks icon on the block (its tooltip is Select audio track) to see or change it.
- Noise reduction works best on steady noise. It cannot remove sudden sounds such as a cough, a door slam or a car horn; silence such places instead (see Adjusting Audio Levels in Your Video).
- Keys in the settings windows: Enter = OK, Esc = Cancel, Space = Preview (in the Pitch shift, Equalizer and Reverb windows).
Related topics
- Adjusting Audio Levels in Your Video
- Add Audio to Audio Library (including recording from a microphone)
- Changing Video Speed
- Music Visualizer
- Saving a Frame as a Picture and Viewing File Info
Back to Video Editing Guide.