
Lossless Cut and Join with Virtual Clips
Sometimes you don't need to edit a video at all — you just need a few pieces of it. Two minutes from an hour-long dash cam recording, the best moments of a game stream, one question from a recorded webinar. Saving them through the timeline means re-encoding: it takes time, and every re-encode loses a little quality.
Virtual clips solve this. You mark the fragments you need in a video file, and the program saves them as separate files, or joins several fragments of the same file into one, without re-encoding. The video and sound are copied as they are, so even a fragment of a long 4K video is ready in seconds, with exactly the original quality (lossless).
What a virtual clip is
- A virtual clip is just a start and an end mark in a video file. No copy of the file is made, so you can mark as many fragments as you like: they take no disk space.
- Virtual clips appear in the Photo/Video Library in their own group, Virtual clips. You can put them on the timeline like ordinary videos, save them as files or join them.
- The original file is never changed.
Open the Virtual clips window
-
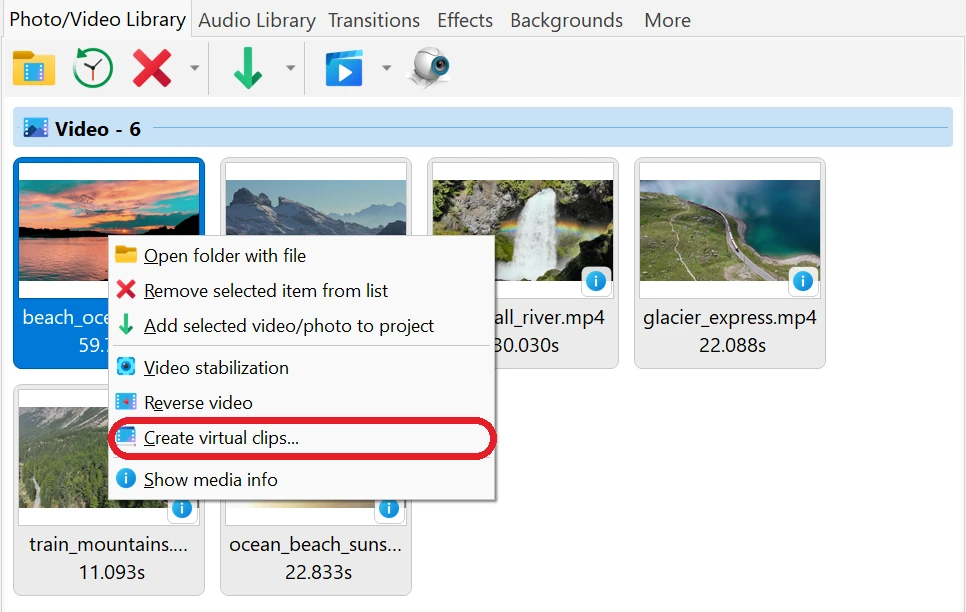
Add the video to the Photo/Video Library, right-click its thumbnail and choose Create virtual clips....
- Or click the video in the library to play it in the preview window and click the Create virtual clips... button on the player bar (right after the Stop button). The window opens at the frame the player is showing, so you can first find the right place in the video.
- The same command is in the drop-down menu of the library toolbar button with Video stabilization and Reverse video.
- To return to the clips of a file later, double-click any of its virtual clips in the library or right-click it and choose Edit virtual clips....
- The Virtual clips window always shows all clips of one video file. Its title shows the file name.
Mark the clips
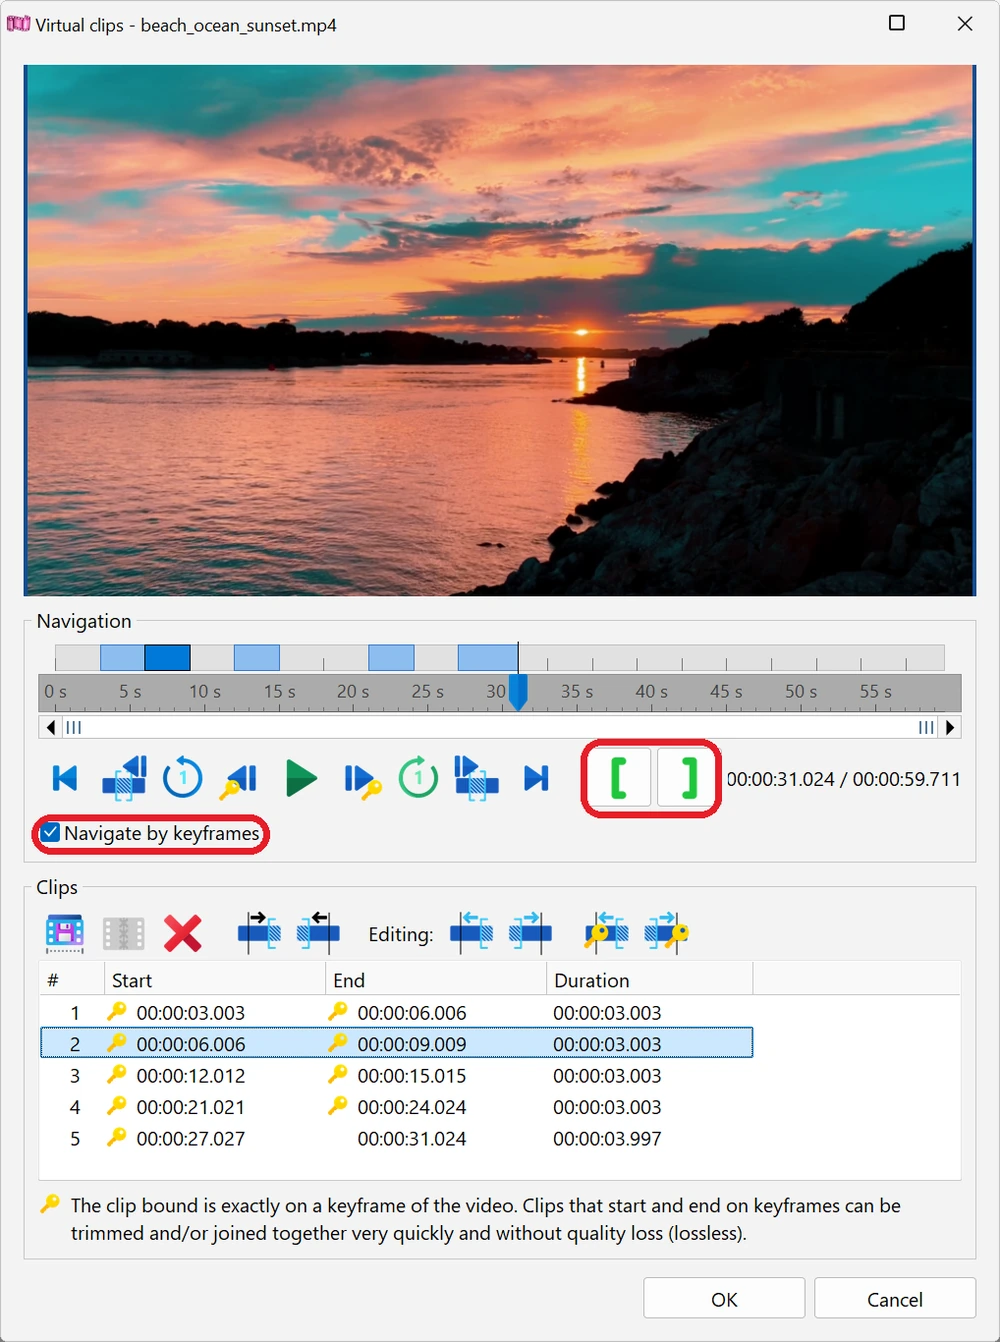
- Find the beginning of the fragment you need. Play the video with the Play / pause button or Space, click or drag on the time ruler, or step with the buttons under it: one frame back and forward (Left / Right), one second back and forward (Shift+Left / Shift+Right), to the beginning (Home) and to the end (End) of the file. When you hover the mouse over the ruler, a tooltip shows the frame at that point and its time.
- Click the Mark the start of a clip button (green [) or press I. The start mark appears as a green line above the ruler.
-
Move to the end of the fragment and click Mark the end of a clip (green ]) or press O. As soon as both marks are set, the clip is added to the list below and shown as a blue bar above the ruler. Now you can mark the next one. If you set the end before the start, the program simply swaps them.
- Clips may overlap: the same moment can belong to several clips.
- For a long video, zoom in on the ruler: Shift + mouse wheel, Ctrl+Plus / Ctrl+Minus, or drag the edges of the scroll bar under the ruler. The mouse wheel scrolls the view. Double-click the scroll bar (or press Ctrl+8) to see the whole file again.
- Ctrl+Left / Ctrl+Right jump to the nearest start or end of a clip, which is handy for checking the bounds you have set.
The list of clips
- The list shows the number, Start, End and Duration of every clip, sorted by start time. Click a clip in the list or on its bar above the ruler to select it; hold Ctrl or Shift to select several, Ctrl+A selects all.
- The buttons above the list (left to right): Save the clip as a file..., Join without re-encoding..., Delete the selected clip (Del), Move the cursor to the start of the clip and Move the cursor to the end of the clip.
- To correct a clip, select it, put the cursor where it should start or end and use the Editing: buttons: Move the start of the clip to the current cursor position and Move the end of the clip to the current cursor position. The other two buttons move the start or the end to the nearest keyframe (see below); they work on all selected clips at once.
- Click OK to keep the clips. Cancel (or Esc) discards the changes made in the window. There is no Undo in this window, so check the list before you click OK.
Keyframes: why some cuts are instant and lossless
- A video file doesn't store every frame in full. Only keyframes are stored as complete pictures, usually one every 1–2 seconds; the frames between them store only the changes. Without re-encoding, a file can be cut cleanly only at a keyframe.
- When the window opens, the program finds all keyframes of the video (for a long file it takes a few seconds; you see building keyframe index...). After that the Navigate by keyframes option turns on: the frame step buttons, the Left / Right keys and clicks on the ruler go to keyframes, and grey ticks above the ruler show where they are. So any mark you set lands exactly on a keyframe. Turn the option off to move frame by frame.
- In the list, a small key icon next to a start or end time means the bound is exactly on a keyframe. A clip with key icons at both ends is saved and joined quickly and without quality loss. If a clip is already marked off a keyframe, select it and use Move the start of the clip to the nearest keyframe and Move the end of the clip to the nearest keyframe.
- What if the start you need is not on a keyframe? You can still save the clip without re-encoding: an MP4 file can start exactly at your mark (see Always start at a keyframe below), and other formats start at the previous keyframe, a little earlier than the mark. Or choose Re-encode (frame-accurate) when saving.
- For some files (for example, some .ts recordings) the keyframe index cannot be built: the window shows keyframes unavailable. You can still mark and save clips, but without key icons, and copies start at the previous keyframe.
Save clips as separate files
- Select one or several clips in the list and click Save the clip as a file... (or Save as files... for several). In the library, you can also select virtual clip thumbnails, even from different videos, and choose Save as files... in the right-click menu.
-
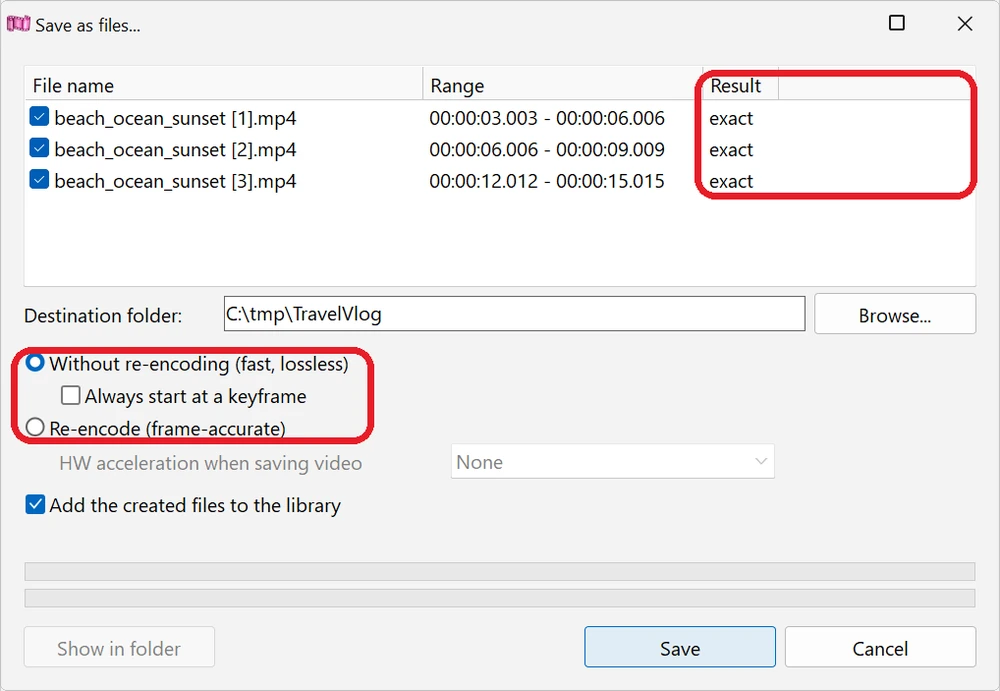
In the save window, every clip is a row with a check box: only checked clips are saved. The File name is the name of the video with the clip number, for example holiday [2].mp4; click a name to change it. Existing files are never overwritten: a number is added to the name instead, for example holiday [2] (2).mp4.
- The files are saved next to the original video. To choose another folder, click Browse... next to Destination folder:.
-
Choose how to save:
- Without re-encoding (fast, lossless) — the default. The video and all sound tracks are copied as they are. The file gets the same type as the original: MP4 and MOV give .mp4, MKV and WebM give .mkv, AVI gives .avi, WMV gives .wmv. Subtitles are not copied.
- Always start at a keyframe (for MP4 only). Without this option, an MP4 file starts exactly at your start mark: the frames from the previous keyframe up to the mark stay in the file but are hidden. Most players respect this, but some players and editors ignore it and show those frames. With the option on, the file honestly starts at the previous keyframe, slightly before the mark, and plays the same everywhere.
- Re-encode (frame-accurate) — the clip starts and ends exactly at your marks, but it takes longer and the picture is compressed again. The video is saved with the same size and frame rate and with a bitrate no lower than the original, so the quality loss is hardly visible; the sound is copied without changes. H.265 (HEVC) and AV1 videos are saved as HEVC, all others as H.264. In the HW acceleration when saving video list choose your graphics card (NVIDIA, AMD or Intel) for fast encoding, or None for the processor.
- The Result column tells you in advance what you will get for each clip: exact — the clip starts exactly at the mark; start: ... (start shifted to the previous keyframe, -1.2 s) — the clip will start a little earlier; copy impossible -> re-encode — this file cannot be copied without re-encoding, so this clip will be re-encoded anyway.
- Add the created files to the library is on by default: the new files appear in the Photo/Video Library as ordinary videos.
- Click Save. The clips are saved one after another; the progress is shown in the window and on the program button in the Windows taskbar. When it is done, the Result column shows saved or failed for each clip, and Show in folder opens the folder with the new files. Cancel stops saving and deletes the unfinished file.
Join clips of one video without re-encoding
- This is how you remove unwanted parts from the middle of a long recording without quality loss: mark the parts you want to keep as clips and join them.
- Select two or more clips in the Virtual clips window and click Join without re-encoding.... Or right-click a virtual clip in the library and choose the same command: the window lists all clips of that video.
-
The Join clips without re-encoding window shows the clips in the order they will go in the result. Uncheck the clips you don't need. To change the order, select a clip and use the Move the clip up (Ctrl+Up) and Move the clip down (Ctrl+Down) buttons.
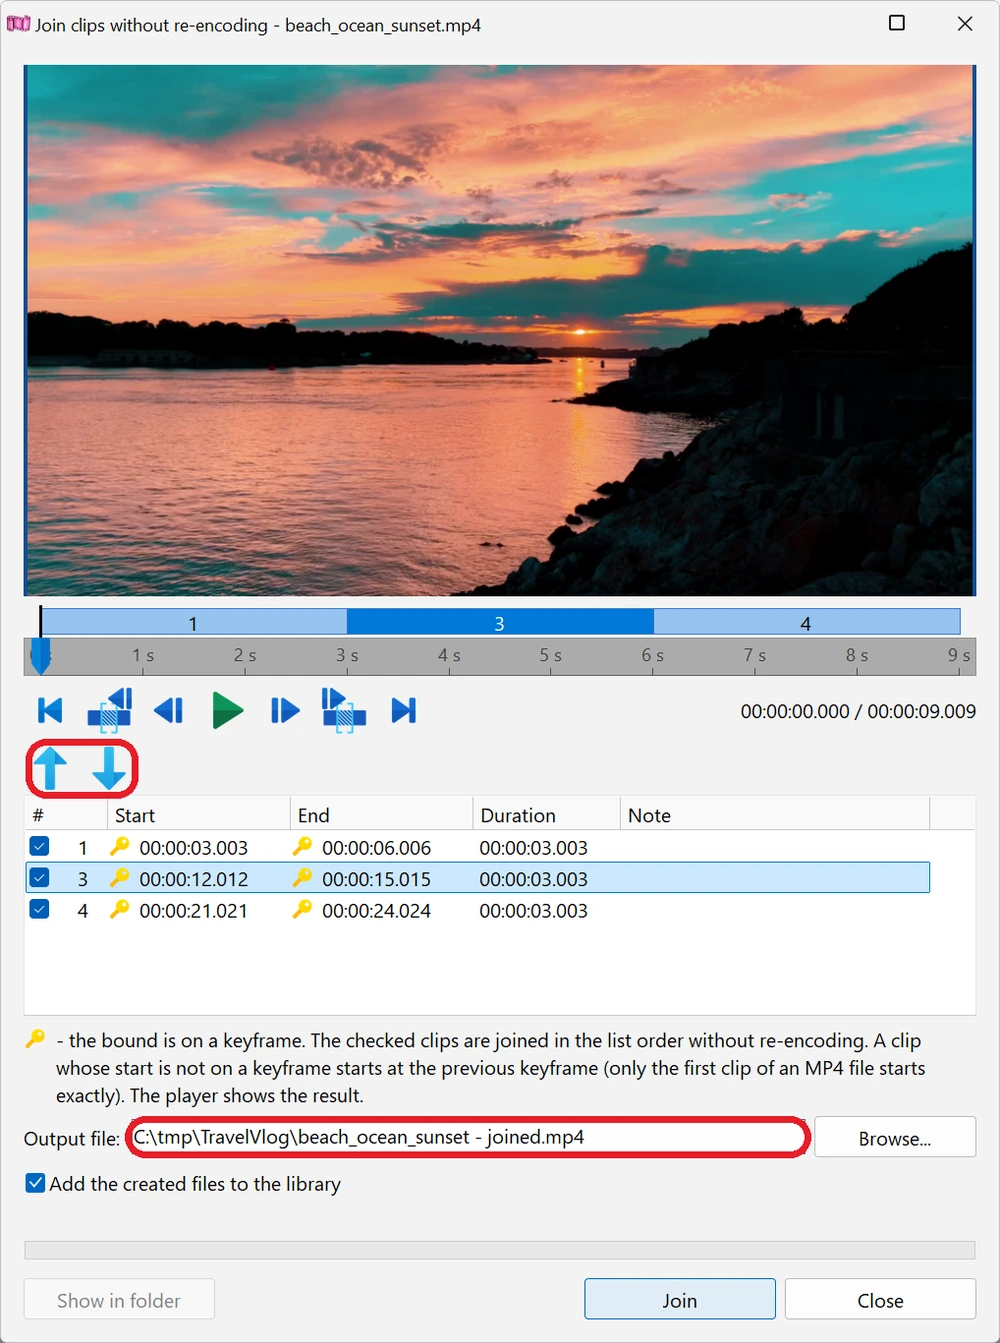
- The player in this window plays the joined result right away, before anything is saved. Ctrl+Left / Ctrl+Right jump to the previous or the next clip; double-click a clip in the list to go to its beginning.
- The Note column warns you when a clip does not start on a keyframe: such a clip starts at the previous keyframe, a little earlier (only the first clip of an MP4 file starts exactly). To avoid this, set the clip bounds on keyframes in the Virtual clips window.
- The result is saved next to the original as <name> - joined with the same file type, for example holiday - joined.mp4. Change it in the Output file: field or with Browse.... Then click Join. When it's done, Show in folder opens the folder with the file.
- Only clips of one video file can be joined this way. To join different videos, put them on the timeline and save the project as a video, see How to Join Multiple Videos into One.
- If the video cannot be copied without re-encoding, the window says Joining without re-encoding is impossible: the streams of this file cannot be copied. In that case put the clips on the timeline and use Save as Video.
Virtual clips in the library and on the timeline
- After you click OK, the clips appear in the Virtual clips group of the Photo/Video Library. Each thumbnail shows the first frame of the clip, the file name with the clip number, for example holiday.mp4 [3], and the clip length. The clips of one file are framed together, so you can see where one video ends and the next begins. The info icon on a thumbnail shows the clip range; On keyframes (no re-encoding) means both bounds are on keyframes.
- Click a virtual clip to play just this fragment in the preview window.
-
Drag a virtual clip onto the timeline, or select it and click Add selected video/photo to project. It becomes an ordinary video block cut to the clip's range, with the clip number in its name. You can trim it further, add effects, texts and transitions as usual; the clip's bounds work as the beginning and the end of the "file". This is a quick way to pick the best moments from a long video first and edit them later.
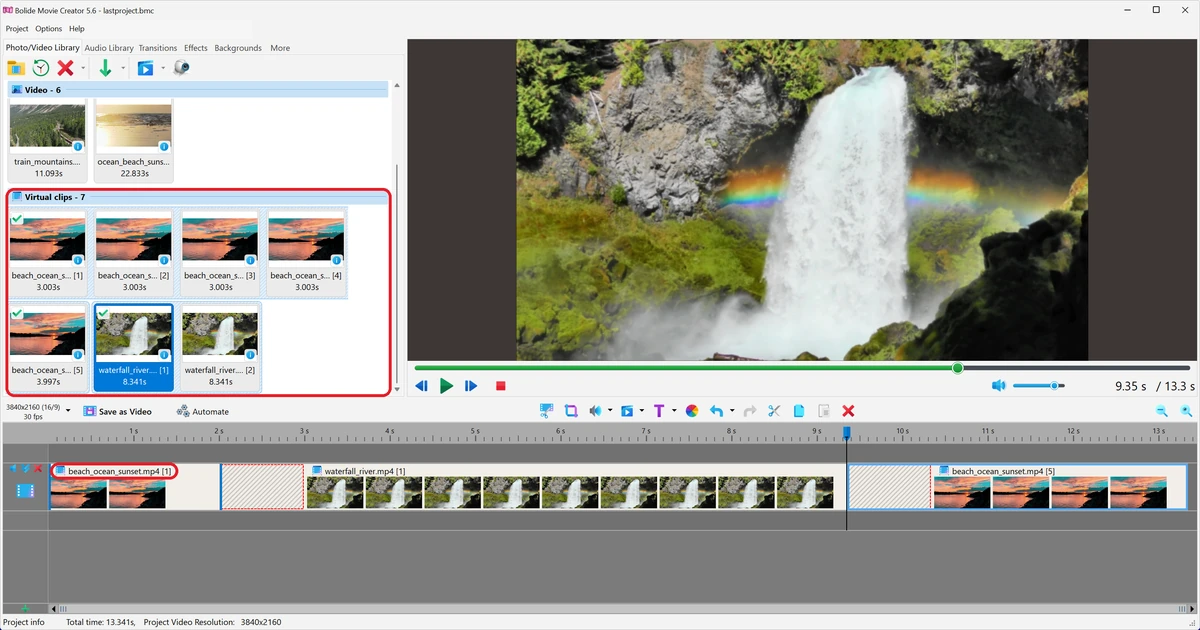
- The block on the timeline keeps its own bounds: if you change or delete the virtual clip later, blocks already in the project stay as they are.
- Virtual clips are saved in the project file together with the library (see Saving and Opening Projects). To delete a clip, select its thumbnail and click Remove selected item from list. Removing the video file itself from the library does not delete its clips.
- If the original video has been moved or deleted, its clips are shown in red. Right-click such a clip and choose Locate file... to point the program to the file's new place: all clips of that file, and the blocks made from them on the timeline, are fixed at once.
Good to know
- Saving and joining from the Virtual clips window create the files right away, with the bounds you see at that moment, even if you then close the window with Cancel.
- Lossless saving only copies the video. Effects, texts, music and transitions cannot be added this way; for that, put the clips on the timeline and save the project with Save as Video (see Convert Video to another Format).
- Virtual clips work for video files only, not for photos or audio files.
- In the trial version you can save one clip or make one join per program session. Marking clips and using them in your projects is not limited.
Keyboard shortcuts in the Virtual clips window
- Space — play / pause.
- I / O — mark the start / the end of a clip.
- Left / Right — previous / next frame (keyframe, when Navigate by keyframes is on).
- Shift+Left / Shift+Right — one second back / forward.
- Ctrl+Left / Ctrl+Right — to the nearest clip start or end.
- Home / End — to the beginning / end of the file.
- Ctrl+Plus / Ctrl+Minus, Shift + mouse wheel — zoom the ruler; Ctrl+8 — show the whole file.
- Del — delete the selected clips; Ctrl+A — select all clips.
- Esc — close the window without saving the changes.
Related topics
- Cut and Split Video
- How to Join Multiple Videos into One
- Add Photo/Video to Project Library
- Convert Video to another Format
- Keyboard shortcuts in Bolide Movie Creator
Back to Video Editing Guide.