Quick Clip: a Video from Photos in a Few Clicks
You have a folder of holiday photos and a few short videos, and you want a nice video with music — today, not after an evening at the timeline. The Quick Clip wizard does it in three steps: choose the photos and videos, the music and the style, and the program assembles the whole video for you. It leaves out duplicates and blurry shots, cuts on the beat of the music, adds transitions, smooth photo motion and titles.
The result is an ordinary project on the timeline: you can save it as a video right away or change anything you like by hand.
How to start Quick Clip
- Choose Project > Quick Clip....
- Or click the Make a clip automatically link on the empty timeline of a new project.
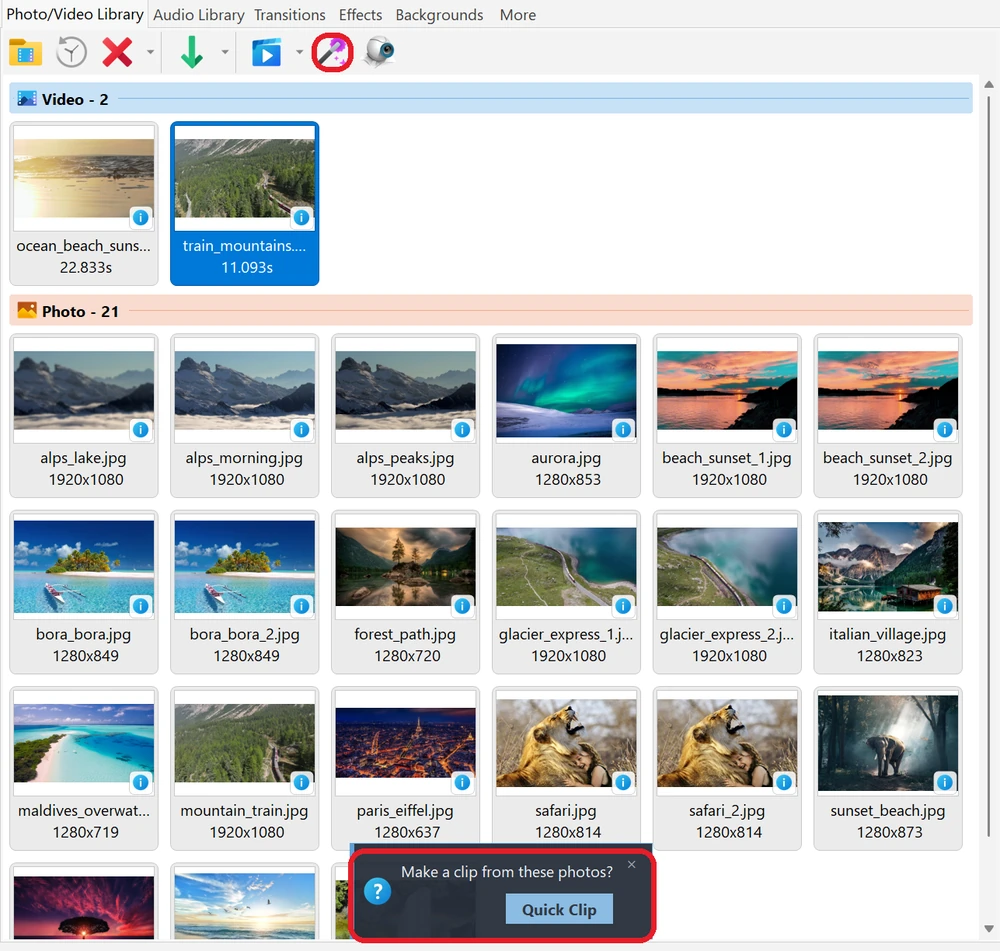
- Or click the magic wand button on the toolbar of the Photo/Video Library. If two or more files are selected in the library, the wizard opens with them; otherwise it takes all files of the library.
-
When you add 10 or more photos to the library of an empty project, the program offers: Make a clip from these photos? Click Quick Clip in the message to open the wizard with these photos.
Step 1 of 3. Photos and videos
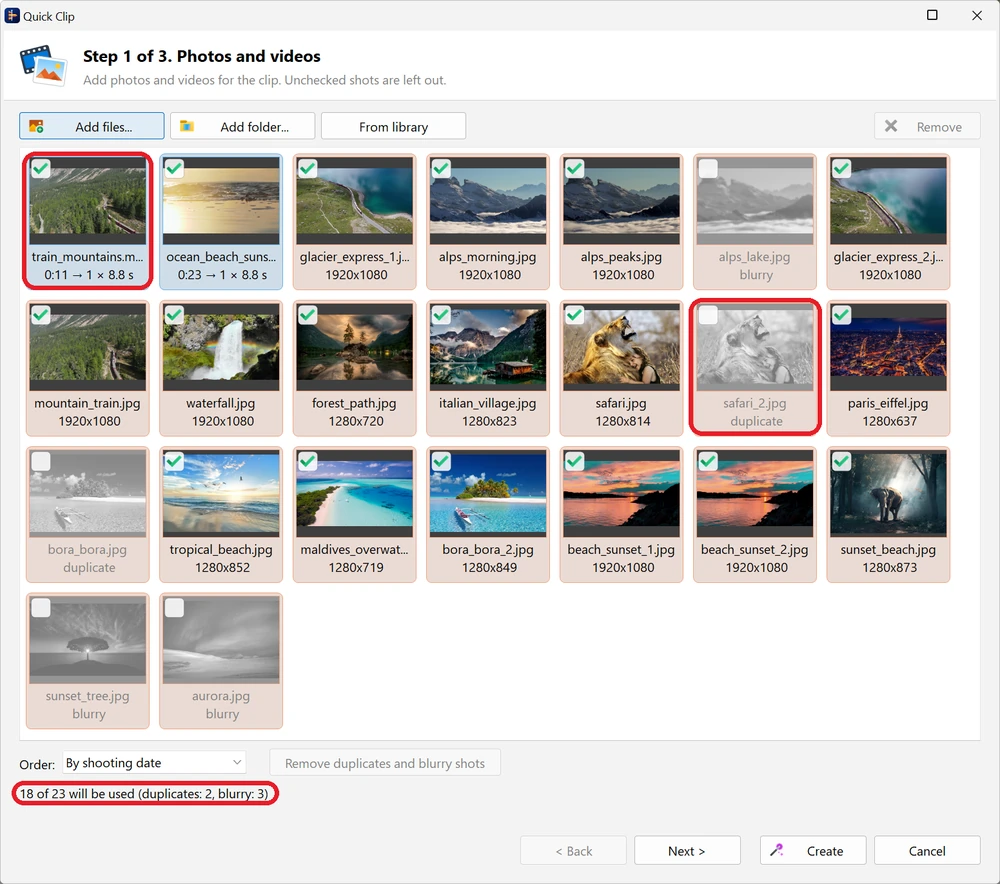
- Add files with the Add files... and Add folder... buttons, take them From library (the selected files of the Photo/Video Library, or all of them if nothing is selected), or simply drag them from Windows Explorer into the window. Music files dropped here go to the music list of step 2.
- Each file is shown as a tile, as in the library: photos with an orange accent, videos with a blue one. The check mark on a tile means the shot goes into the clip. Click the mark (or press Space) to include or leave out the selected shots; tiles that are left out look dimmed.
-
While you look through the files, the program analyzes them (the progress is shown under the list) and sorts out the shots you would hardly want in a clip:
- duplicate — several almost identical shots taken within a minute of each other. The sharpest one stays, the others are left out;
- blurry — a photo that is noticeably less sharp than the rest of the set (checked when there are at least 8 photos);
- cannot open — a damaged or unsupported file. Such a tile is red and cannot be used.
- Double-click a photo to view it large; the window title shows its size and the program's verdict. The mouse wheel zooms in at the cursor, drag to move the picture, Left / Right (or Page Up / Page Down) go to the neighbouring photo, a click, Esc or Enter close the view.
- The second line under a video tile shows how the video will be used, for example 0:45 → 3 × 2.5 s. A long video goes into the clip as several short pieces from different parts of the file, taken from the liveliest moments: loud ones, with events or speech. A short video gives one piece. When there are photos in the clip, videos take no more than about 40% of its length.
- To choose the pieces yourself, right-click the video and choose Choose fragment..., or double-click it. The Virtual clips window opens and shows the pieces the program has planned; mark your own fragments as described in Lossless Cut and Join with Virtual Clips and click OK. Each fragment becomes a separate tile, and the wizard uses exactly these fragments. Whole video in the same menu puts the video into the clip in full, in one piece.
-
The Order: list sets the order of shots in the clip:
- By shooting date (the default) — by the date the camera or phone wrote into the file. Shots taken with a long pause between them form separate scenes, and the best photo of a scene goes first, so that it falls on a strong beat of the music;
- By file name — handy for scans and pictures without a shooting date;
- As added, Random;
- Manual — drag the tiles into any order. As soon as you move a tile, the list switches to Manual by itself.
- Remove (or Del) removes the selected tiles from the wizard. The files on the disk are not touched.
- Click Next >.
Step 2 of 3. Music and length
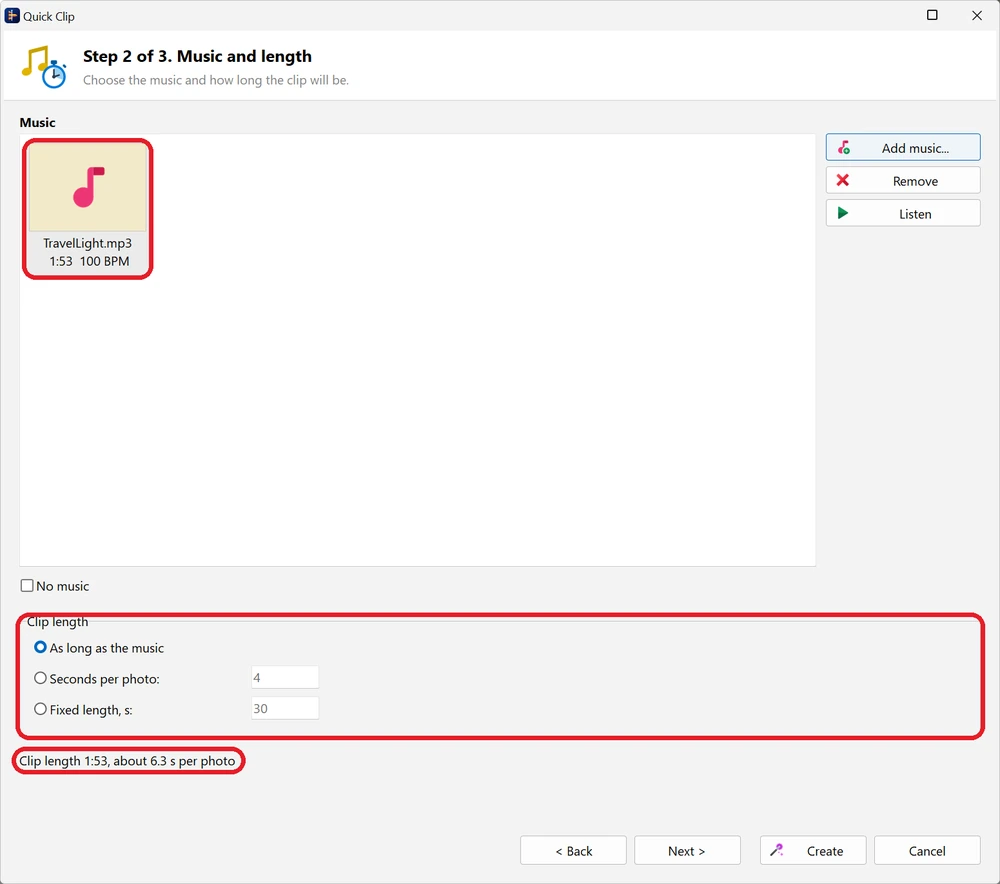
- Click Add music... and choose one or several tracks. They play one after another in the order of the list; drag a tile to change the order. Listen / Stop lets you check a track, Remove deletes it from the list.
- The program listens to the music, finds its beat and puts the cuts on the beats; a new scene starts with a new musical phrase. If a track has no clear beat (classical music, ambient, speech), the cuts are spread evenly and drawn to the accents of the music. The tempo the program has found is shown on the track tile, for example 100 BPM.
- The music fades in at the beginning and fades out at the end; silence at the edges of a track is skipped. If the clip is longer than the music, the music is repeated with a smooth crossfade. Where a video has its own sound, the music gets quieter, and even more so under speech, so that the words can be heard.
- No music makes a clip without music.
-
Clip length:
- As long as the music (the default) — the shots are spread over the whole length of the music;
- Seconds per photo: — how long each photo is shown (4 seconds by default);
- Fixed length, s: — the length of the whole clip in seconds (30 by default), for example for a 30-second Shorts video.
- Click Next >.
Step 3 of 3. Style and format
-
Choose a Style. It sets the transitions, the photo motion, the pace and the colour tone of the clip:
- Calm — smooth cross-fades, slow photo motion, warm tone;
- Dynamic — fast cuts, slides and zooms, energetic motion;
- Wedding — soft cross-fades and glow, gentle motion, warm cream tone;
- Travel — push and cube transitions, panoramic motion, cinematic teal and orange;
- Birthday — bright playful transitions, lively pace, festive titles;
- Retro — iris and wipe transitions, slow motion, sepia tone.
-
Frame format: 16:9 widescreen (1920×1080) for a TV, a computer or YouTube, 9:16 vertical (Shorts, Reels) (1080×1920) for phones, or 1:1 square (1080×1080). A photo or video of another shape, for example a vertical photo in a 16:9 clip, is shown in full on a blurred copy of itself instead of black bars.
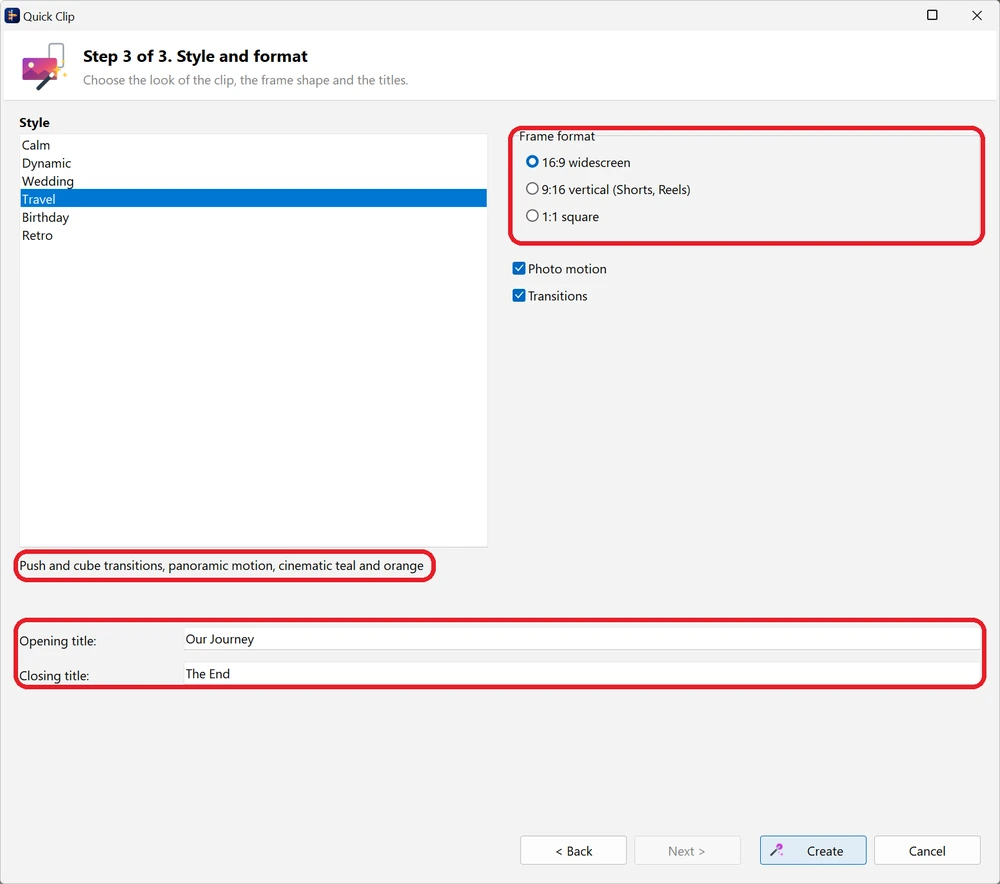
- Photo motion — slow zoom and pan over photos (the Pan and Zoom effect), moving towards the most detailed part of the picture. Turn it off if you want still photos.
- Transitions — turn it off to join the shots with plain cuts.
- Opening title: and Closing title: — the texts at the beginning and the end of the clip. The opening title is suggested by the style (for example, Our Moments or Happy Birthday!), the closing one is The End. Type your own text, or clear the field if you don't need a title.
- Click Create. You can go < Back to any step before that.
After you click Create
- If the project already has clips, the program asks Where to put the new clip? New project closes the current project (offering to save it, if needed) and starts a new one; Add to the end puts the clip after the last block of the project and keeps the project's resolution.
- If the analysis of the files or the music is not finished yet, a progress window waits for it. Then the clip appears on the timeline: photos and videos with transitions and motion, the titles and the music. All its files are added to the libraries. In a new project, the project resolution is set by the chosen frame format.
-
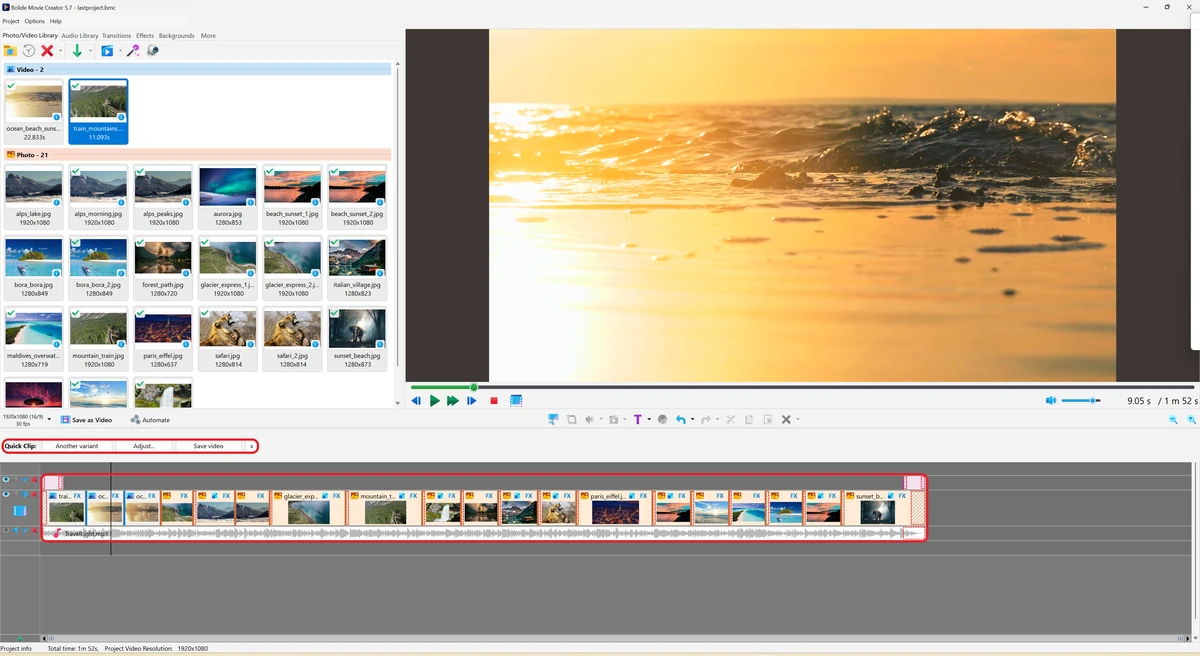
A Quick Clip bar appears above the timeline:
- Another variant — the same shots and music, but other cuts, transitions and motion. Click it until you like the result;
- Adjust... — opens the wizard again at step 3 (go < Back to change the files or the music). After Create, the clip is rebuilt in place of the previous one;
- Save video — opens the usual window for saving the project as a video file (see Convert Video to another Format);
- × — hides the bar.
- The whole clip is one undo step: Ctrl+Z removes it.
Finishing the clip by hand
- Everything the wizard has created consists of ordinary blocks. You can move and trim them, delete a photo, change a transition (see Add Transitions and Effects), the photo motion (Pan and Zoom Effect for Photos), the text of the titles (Add Text Comments to Video) or the volume of the music (Adjusting Audio Levels in Your Video).
- Save the project with Ctrl+S to come back to it later (see Saving and Opening Projects).
Good to know
- The best results come from 20–100 photos and a song of 1–3 minutes. A few short videos make the clip livelier.
- For Shorts, Reels and TikTok choose 9:16 vertical and Fixed length of 15–60 seconds.
- Until you close the program, the wizard remembers the files and the settings. When you open it again, the files you added before are still in the list; remove the ones you don't need.
- The wizard never changes your files: it only puts them into the project.
Related topics
- Add Photo/Video to Project Library
- Add Audio to Audio Library
- Lossless Cut and Join with Virtual Clips
- Pan and Zoom Effect for Photos
- Add Transitions and Effects
- Convert Video to another Format
Back to Video Editing Guide.